Audio reactive webcam free download

Just a quick blog post on a Max for Live patch I had been working on which I have provided a free download of, the video of the patch is below , music is by very talented Ilkae-(track titled “KK”)  be sure to check his music out.

https://ilkae.bandcamp.com/

This patch was inspired by Masato Tsutsui who would be one of my favourite programmers/digital artists. By following his two tutorials which are linked at the end of the post , I was able to use the feed from my webcam as a texture, which was then made audio reactive in Ableton Live 9.6.

I advise you to watch both of his tutorials because he explains on how to use a webcam feed as a texture better than I can even though his tutorials are in Japanese ! .

After completing his two tutorials , I decided to continue on and make the patch both audio reactive and to be able to work in Ableton live as a Max for Live patch.

I have covered how to create a basic audio reactive Max for Live patch here and here, this same method is used to make the relevant shape audio reactive.

I have included the Max for Live patch as a free download .

The patch will be in presentation mode , to view patching mode press the yellow button as displayed in the image below. By pressing cmd+E you will unlock the patch.

Screen Shot 2016-02-24 at 22.37.13

I have commented the patch to try help explain some parts of it , if you have any questions feel free to ask , thank you for reading this post.

To install the patch

  • Open up Ableton Live
  • Select the Master Channel
  • Drag and drop the .amxd file into the effects
  • Drag in a track into any audio channel
  • Press the toggle to start the patch and select open to start the webcam
  • Play an audio file and view the screen (esc will put the screen into fullscreen mode)

http://audiovisualacademy.com/avin/en/software/maxmspjitter-masato-tsutsui-camera-part-1/

http://audiovisualacademy.com/avin/en/software/maxmspjitter-masato-tsutsui-camera-part-2/

https://vimeo.com/masato221

Advertisement

Ableton Jitter Device & Explaination

Max for Live Jitter Device

For my last post , I wrote a tutorial on creating and provided a free download to a fairly basic Max for Live Jitter device (can be read here). 

For this post , I am going to talk through the Max for Live device which I developed with help from Robin Price for my final year project in college , the link to download this is at the bottom of the page . 

The device is similar to the last blog post as the jit.catch~ object is used for audio analysis and both jit.gl.gridshape & jit.gl.mesh objects are used.

The gridshape is added to the matrix by giving the object the @matrixoutput attribute. The gridshape sends out X, Y and Z co-ordinates and in the case of this patch, audio matrices are added to the Z plane for animation. This is achieved by forming a mathematical operation using the jit.op object, “jit.op@ op pass pass + “ means the signal from jit.catch~ , passes the X plane, passes the Y plane and is added to the Z plane

Screen Shot 2016-03-10 at 21.47.31

Creating a Texture

An initial texture is taken from jit.catch~ ,the matrices are taken from the object and sent to jit.op where a mathematical operation is done, in this case it is to increase the amplitude going into the jit.catch~ which makes the quieter sounds more visible.

From here the signal is sent to the matrix and then to jit.gl.texture where a texture is created.

The texture is name @texture 1, by adding the @texture attribute to the jit.gl.mesh object; the name of the newly created texture can be added directly to the shape. The attribute used here is @texture texture 1. 

Screen Shot 2016-03-10 at 20.47.20

A further texture is added which was obtained in the examples folder in Max 7. This JavaScript file creates the main texture, which will be seen in screen behind the electronic music performer.

jit.gl.shader is used and the file name is referred to. In Jitter there are three different types of texture mappings.

Object Linear

Applies texture in a fixed manner relative to objects co-ordinate system, this means as an object is rotated and positioned , the texture will stay the same.

Eye Linear

As the object rotates , the texture changes

Sphere map

Environment mapping, rendered as though it is reflecting the surrounding environment. The texture changes as the model moves.  

By using the @tex_map1 attribute in the  jit.gl.mesh object will set the texture mapping to object linear. The poly_mode attribute is set to 0 1, this means that the front of the rendered shape will be solid while the back will be wireframe.

Screen Shot 2016-03-10 at 21.58.50

To allow the function to switch between full screen, the key and sel objects are used. By using ascii where each key on the keyboard is given a number, any key can be used to trigger a message in Max MSP. In the case of this project, the escape key is set to switch between full screen, being ascii number 27, once this key is pressed, it turns the toggle one which activates the full screen message which is being sent to the jit.window object

Screen Shot 2016-03-10 at 22.16.31

With the shape stationary on the screen it was decided to animate the shape and allow for the definition of a viewpoint change. To change the viewpoint, the jit.gl.camera object is used.

With the ability to change camera position , lens angle or zoom and camera rotation , adds variation to the video output.

To animate the OpenGL shape, the jit.anim.drive is used. With this object OpenGl shapes can be rotated, moved to a specified location and scaled to a specified size.

By using the turn 111 message enables the audio analysis output to rotate 360 degrees with each number representing the X, Y and Z axis respectively.

A message and a dial to adjust the speed of rotation is added and this will be the first of the projects live ui objects.

Screen Shot 2016-03-10 at 22.16.21
jit.gl.camera
Screen Shot 2016-03-10 at 22.16.14
jit.anim.drive (figure 1)

The next stage of the patch is to implement MIDI mappable parameters, meaning that the user can map live UI objects to their hardware MIDI controller and to have the ability to change how the video is displayed.

A live UI object is one ,which is recognised by Ableton Live and available to map to a MIDI controller.

In Max for live , any attribute which has an integer or flonum can be controlled using an Ableton Live specific dial, fader, toggle or button. Creating a message with the attribute name followed by $1 allows for the value to be changed by a live object.This can be seen in figure 1 above.

Preset Object.

Due to the customisable parameters in the patch, it was decided next to implement a preset system. So if the user found an interesting output he/she could save this as a preset, which can be recalled during their live performance.

Three objects are required to have the ability to store and recall preset`s, these are pattrstorage, autopattr and preset. To open the client window with all live UI objects and their current relevant values, you double click on the pattrstorage object .To avoid confusion, each live UI object is given a unique scripting name, this will be viewable in the client window. To give an object a scripting name, the live UI object in question in selected and by pressing command and I ,the scripting name can be changed to a unique name. See figure 2.

Screen Shot 2016-03-10 at 22.33.32
Preset Figure 2

The preset graphical user interface is used to save and recall presets. By holding shift and clicking on an empty slot you will store all current values. Once a value is stored the empty clip changes to yellow. Although this colour can be changed in the inspector menu.The pattrstorage object takes a snapshot of all values and stores it to the empty slot selected.

The Max for Live patch can be downloaded here ,if you have any questions feel free to leave a comment / follow, thank you for reading.

The new mastering engine is here. Get that crystal clear & airy sound for your tracks.

Very Basic Max for Live Jitter + Download

Max for Live Introduction 

When the developers of Cycling 74 met with both Robert Henke and Gerhard Behles from Ableton Live, Max for Live was soon formed. This programme allowed for the development of devices such as synthesisers, drum machines, audio effects, MIDI effects and the implementation of live video into the music creation and performance software using Max MSP. Max for Live allows Max MSP to be used to create MIDI effects (which processes MIDI data), audio effects (for processing audio) and for the development of instruments (takes MIDI performance data and transforms it into audio).

These devices can be created in Ableton Live for real time processing (ability to hear instruments as you develop them). With the series of specific Max for Live objects available (which all begin with live.), MIDI mapping parameters of a created device to a hardware MIDI controller is achievable.

Some of the objects include:

Live.dial: Circular slider or knob which outputs numbers according to its degree of rotation.

Live.gain: Decibel volume slider or monitor

Live.slider: Output numbers by moving a slider on screen

Live.toggle: Creates a toggle switch that outputs 0 when turned off and 1 when turned on.

By pressing command and m, these live objects can be mapped to any recognised MIDI controller, a GUI (Graphical User Interface) can be designed within the Max for live vertical limit to create both ease of use and accessibility for the user.

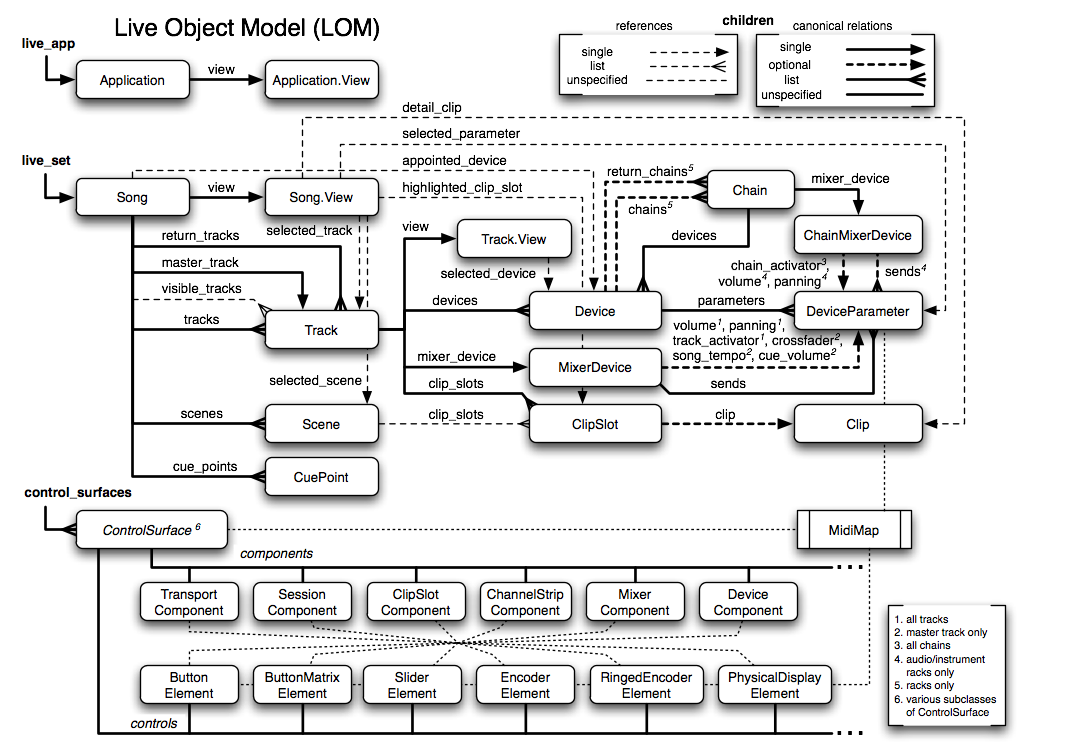
Max for Live works through access of the live object model, this map is a guide to everything accessible within Ableton Live. Not all parameters are available in the music software’s Application Program Interface (API), the live object model shows what max for live has access to.

ObjectModel

Creating a Max for Live Jitter Patch: 

Below I am going to briefly demonstrate how to create a basic Max for Live Jitter patch , I recommend you right click on each object used and select “reference” to read up on them more, it is one of the best ways to learn Max in my opinion. The download link for the created patch is below. The idea of this post is to demonstrate to people new to Jitter on how to create a basic audio reactive patch to work within Ableton live , I have added comments in the patch to try and explain on how it works.

To create a Max for Live device we first open up Ableton Live. Select Max for Live and drag in an empty Max for Live audio effect into the master channel.

Screen Shot 2016-02-24 at 21.02.04

This creates an empty audio device patch with just the plugin~ and plugout~ objects. These represent the audio coming from Ableton Live and the audio being sent to the audio output device.

When creating an audio effect, signal (which is indicated by the green and white patch chords) from Ableton is routed through a created effect and then sent to the left and right outputs.

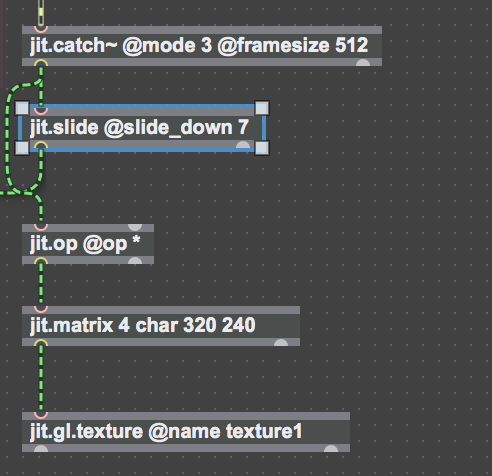
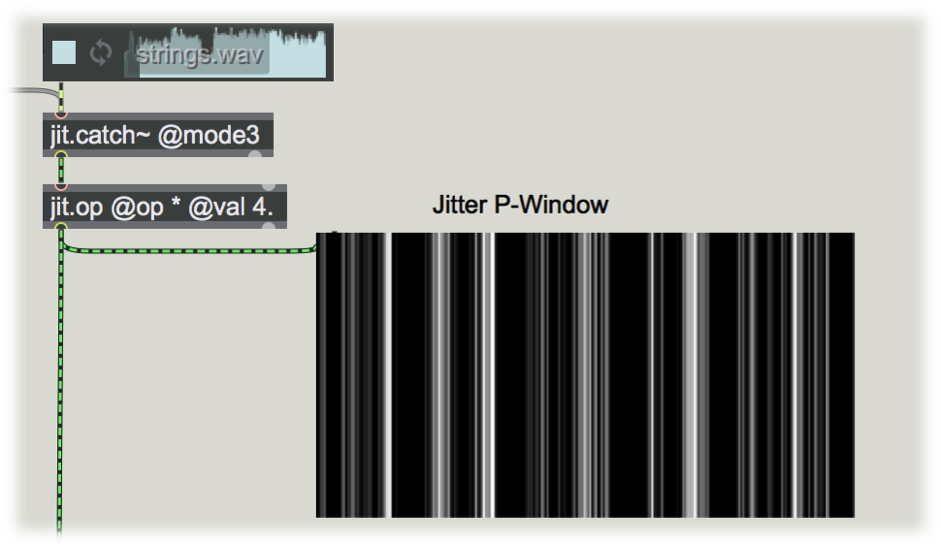
For a Jitter patch, a copy of the audio signal is taken for audio analysis while leaving the plugin~ and plugout~ objects intact. This means that the audio will play as normal while also being sent to the relevant Jitter object for audio analysis.

Drag in a track of your choice to the same channel, which will be used for audio analysis for the creation of the jitter patch.

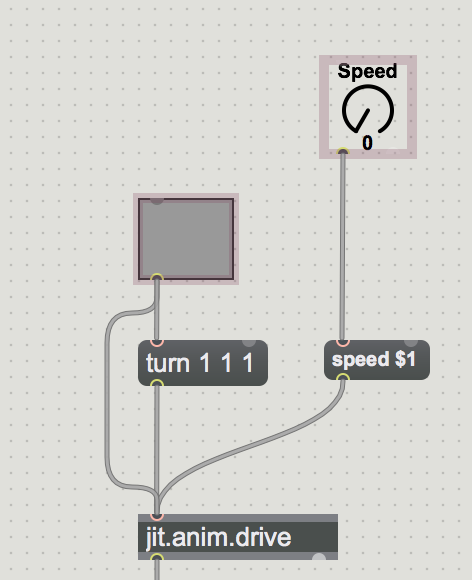
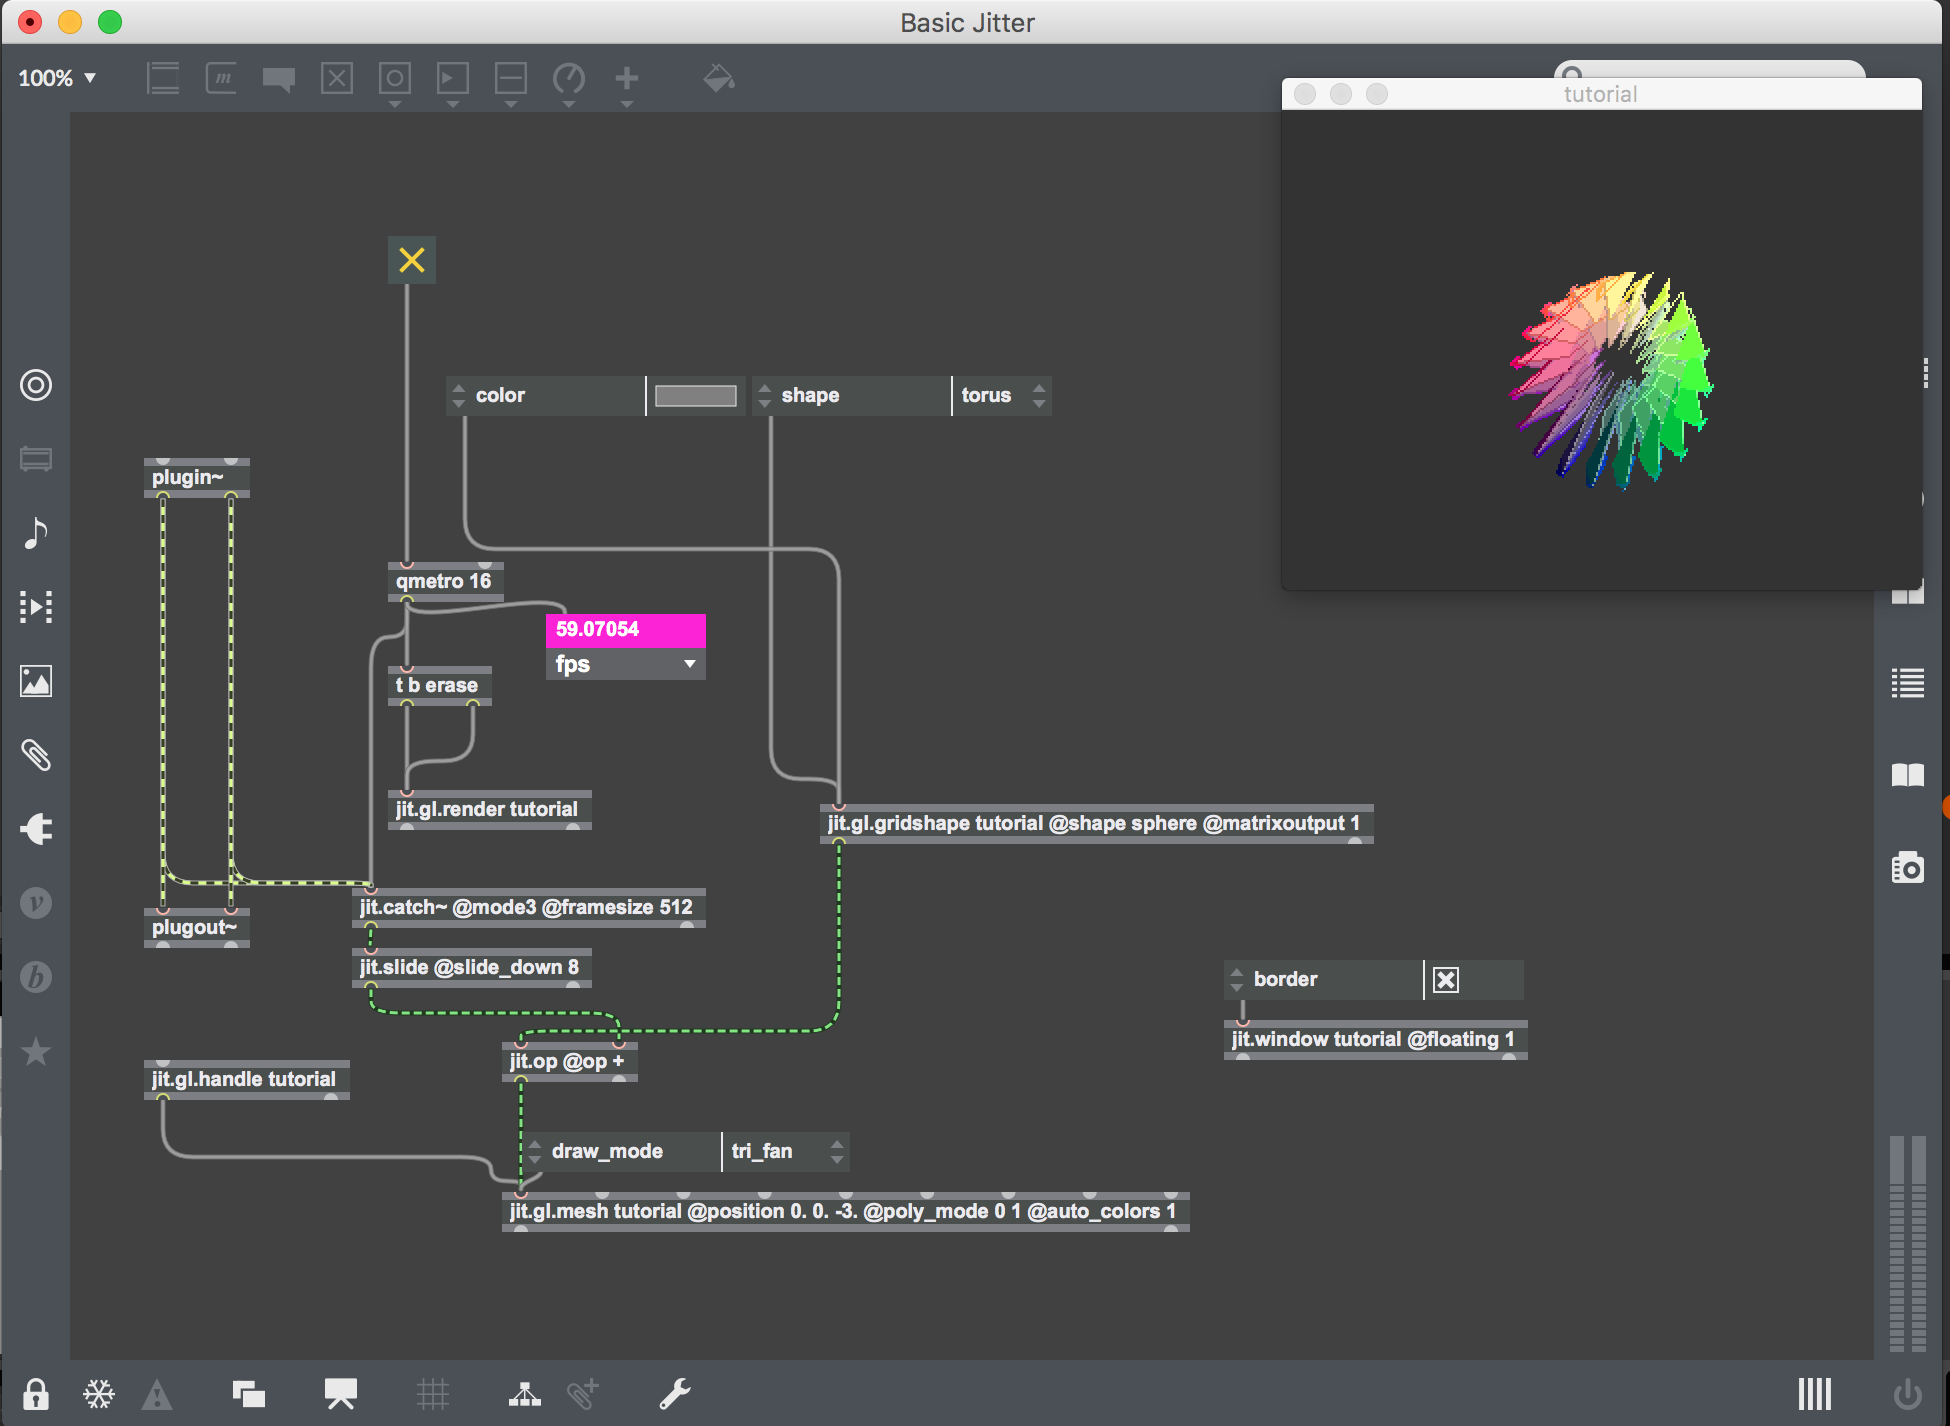
The Qmetro object bangs out frames per second, this is activated using the toggle and once it is selected the Qmetro starts the video. The Qmetro object has low priority properties, compared with the Metro object which triggers a bang at the set interval at all times. Meaning it will slow down in triggering bangs depending on current CPU usage, resulting in a lower frame rate. To view the frame rate , the jit.fpsgui object is used. This is attached to the jit.gl.render object.

To allow of the drawing and rendering of OpenGL, the jit.gl.render object is needed. This renders OpenGL objects to the destination window.

For a video to be rendered successfully , a message is required to allow for the erasing and drawing of frames. A trigger bang erase message is used , this first erases the existing frame , then receives a bang from Qmetro releasing a new frame and the trigger to draw the next frame, this process is then repeated.

By leaving out this message will result in the image being constantly drawn over and over again on the same frame.

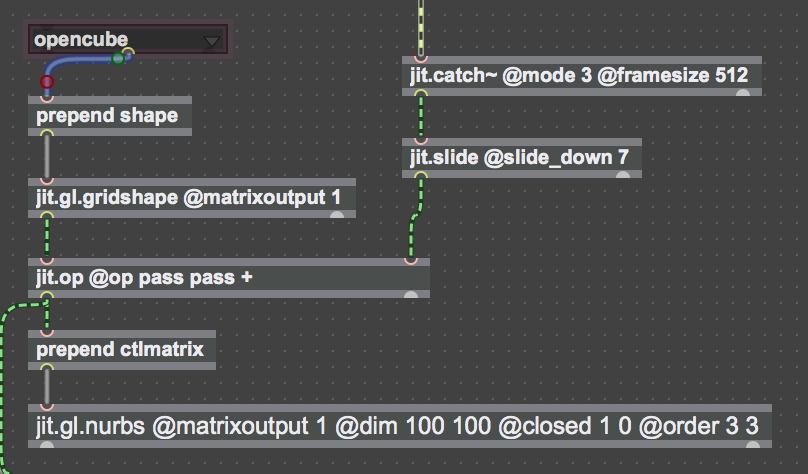
To analyse the audio , the jit.catch~ object is used which transforms audio into matrices. These matrices can be seen by connecting the jit.pwindow  to the outlet of the object.

image

The next stage is to create a shape , to do this adds the jit.gl.gridshape object. This creates defined shapes such as sphere, torus , cube , plane , circle and others.

The jit.op object is added , this object is used to add the matrices from the jit.catch~ object to the gridshape. The @ symbols represent attributes for an object , in the case of jit.gl.gridshape, @Shape Sphere is added , this will automatically draw a sphere shape once the main toggle switch is pressed .

To add a menu of an attribute , click on the left hand side of the object (in this case the jit.gl.gridshape object) select shape , this will add a scrollable menu , allowing you to change to different pre determined shapes. This object is then attached to the jit.gl.mesh object, through changing attributes give you the ability to have different draw modes such as polygon, line, point, triangle, quads and line loop. These determine how the shape will be drawn. The @auto_colors attribute is added to give an array of colour onto the gridshape.

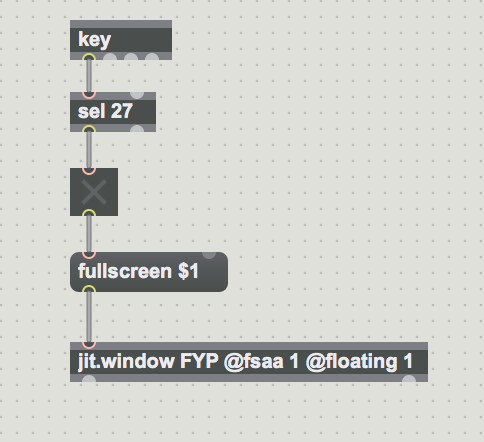
The jit.window object is added , this will create a floating screen where your visuals will be rendered.
The jit.gl.handle object is added, this allows you to move the gridshape with your mouse, it can be rotated, zoomed in and out (hold alt and click mouse), or positioned on screen (hold Cmd and click mouse)

Screen Shot 2016-02-24 at 23.55.20 
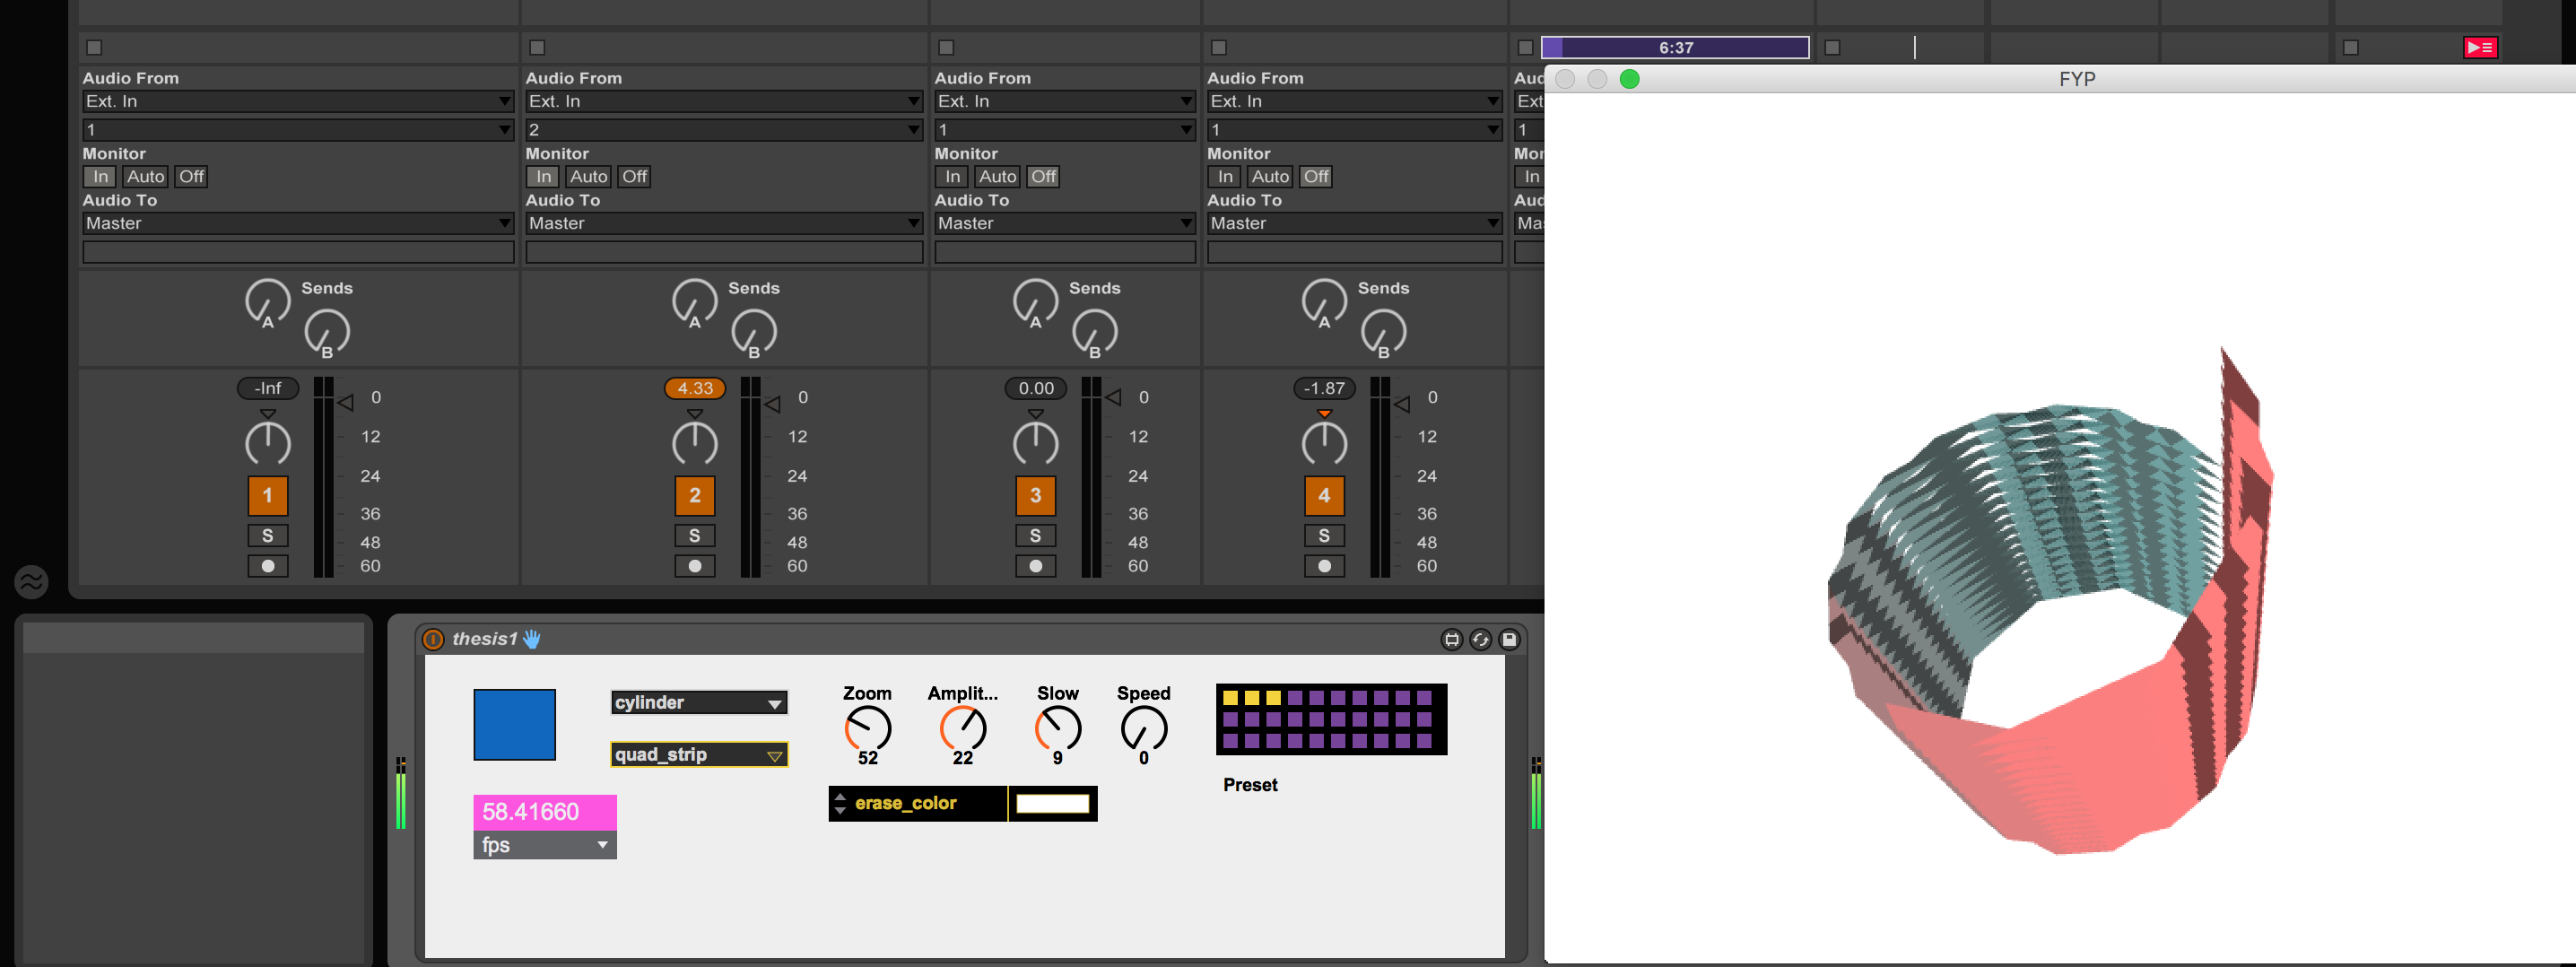
Finished Max for Live Patch

In Max there is both a patching mode and presentation mode, the latter being used to create the graphical user interface in Ableton Live. Which an example of can be seen below.

Screen Shot 2016-02-24 at 22.06.55
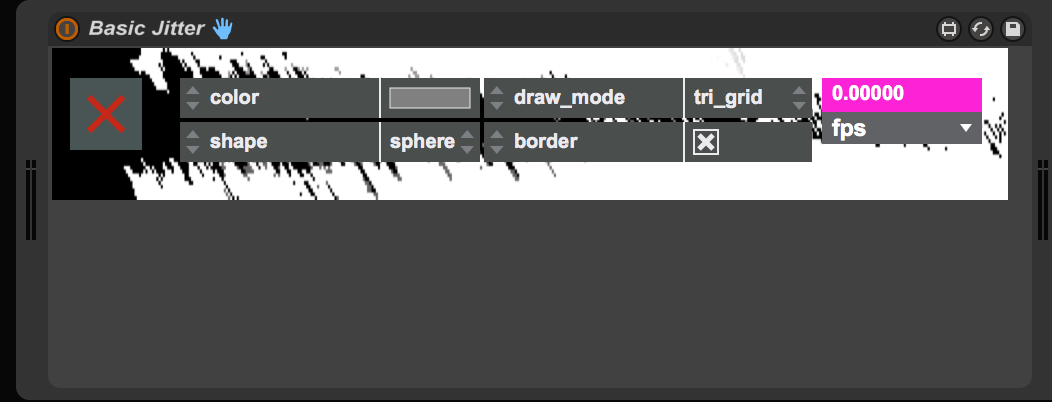
To add an object to presentation mode , just right click and select “Add To Presentation Mode” , when all relevant objects are selected then press “Alt + Cmd+E” or press the yellow highlighted button in the screenshot below, this will switch between Patching Mode and Presentation Mode. Screen Shot 2016-02-24 at 22.37.13

When in Presentation Mode , all relevant objects can be positioned above the vertical device limit. The device can be downloaded here . Press Cmd+E to unlock the patch and switch to patching mode to view this basic patch.

If you have any questions , feel free to leave a comment ,thank you for reading.

I should have another post up soon enough , please follow if interested.

The new mastering engine is here. Get that crystal clear & airy sound for your tracks.

Max for Live Jitter Patch

Ive been working on a few Max for Live patches over the last month or so , Im still relevantly new to Max and Jitter and constantly learning more each week.

This patch was inspired by Masato Tsutsui who would be one of my favourite programmers/digital artists. By following his two tutorials which are linked at the end of the post , I was able to use the feed from my webcam as a texture, which was then made audio reactive in Ableton Live 9.6 .

The idea of the patch was to see movement of who ever is in front of the webcam while also being audio reactive to the music playing in Ableton Live , I still have more that I would like to do with the project.

The video of the patch is below , music is by very talented Ilkae-(track titled “KK”)  be sure to check his music out.

https://ilkae.bandcamp.com/

Max for Live allows Max MSP to be used to create MIDI effects (which processes MIDI data), audio effects (for processing audio) and for the development of instruments (takes MIDI performance data and transforms it into audio).

These devices can be created in Ableton Live for real time processing (ability to hear instruments as you develop them). With the series of specific Max for Live objects available (which all begin with live.), MIDI mapping parameters of a created device to a hardware MIDI controller is achievable

When creating an audio effect, signal (which is indicated by the green and white patch chords) from Ableton is routed through a created effect and then sent to the left and right outputs, for a Jitter patch, a copy of the audio signal is taken for audio analysis while leaving the plugin~ and plugout~ objects intact. These objects represent the audio coming from Ableton Live and the audio being sent to the audio output device, this means that the audio will play as normal while also being sent to the relevant Jitter object for audio analysis.

To analyse the audio the jit.catch~ object was used. The jit.catch~ object transforms signal data, which essentially is audio into matrices, this can be seen in the image below.

Untitled

For my next blog post , I intend to have a tutorial on creating a basic Max for Live Jitter patch. The links to the tutorials used and the vimeo link to Masato Tsutsui are below, thank you for reading. 

http://audiovisualacademy.com/avin/en/software/maxmspjitter-masato-tsutsui-camera-part-1/

http://audiovisualacademy.com/avin/en/software/maxmspjitter-masato-tsutsui-camera-part-2/

https://vimeo.com/masato221

Summary of my Level 7 and 8 degree Music Projects

Over the last two years my interest in digital art and creative coding has increased. Initially I started using VVVV and this was used in my Level 7 degree final year project, where an Ableton Live user could trigger both video and audio simultaneously using a MIDI device I developed on the iPad using Lemur. Assigning the same MIDI control change message to both Audio and Video both could be played at the same time using just the one laptop.

With VVVV just supporting Windows Direct X , upon purchasing a Macbook Pro , I began to learn Max MSP and Jitter , which was  used to develop my Level 8 degree final year college project in music production. Jitter was a steep learning curve for me and the attendance of a  4 day workshop on creative coding at the Digital Arts Studio in Belfast was extremely beneficial for me.  For my Final Year Project I created a max for live patch which would enable Ableton live users to have a simple visual element to their performances. Using audio analysis, the audio from Ableton Live was used to animated the selected gridshape in Max for Live. This patch was MIDI controllable using any recognised hardware MIDI controller.

Screen Shot 2016-01-15 at 20.17.21
Level 8 Music Production Project Screenshot

Over the last month , I began to work on a several pieces , which can be seen in the collage above. Computer generated art I suppose you could call it.

Thanks for reading this post , the next one will be on Electronica music production.

Max for Live Jitter Project

Screen Shot 2015-06-28 at 21.55.54

The image above is a screenshot of a project that I am currently working on. The feed from my webcam is being used as a texture , which is then applied to the mesh . The mesh allows for different draw modes , changing how the OpenGL shape is drawn. The gridshape object is also used to allow for the changing of shapes and colour (which in this case is pink). The shape is rotated onto its side for preference.

The patch is made audio reactive using the jit.catch~ object. This object transforms signal data into matrices which is essentially audio into animating the gridshape. Increasing the amplitude allows for the representation of quieter sounds on screen.

The idea of the patch is that the video content will change when someone moves in front of the webcam , creating a variation of some sort.

An Introduction

Im an electronic musician who has recently graduated from Limerick Institute of Technology . Over the years I`ve developed an interest in digital art and in the relationship between electronic music and video.
An avid user of Ableton Live , Cubase 8 , Max MSP Jitter/ Max for Live and Processing. I Intend to post screenshots, videos and audio clips of my work and blog about Music Production , Mixing and Mastering Techniques, digital art and the odd tutorial.

Feel free to follow and comment on posts , thank you for reading

The new mastering engine is here. Get that crystal clear & airy sound for your tracks.